
Kafka Streams - The Processor API
by
![]() If you work on systems delivering large quatinties of data, you have probably heard of Kafka if you aren’t using it already. At a very high level, Kafka is a fault tolerant, distributed publish-subscribe messaging system that is designed for speed and the ability to handle hundreds of thousands of messages. Kafka has many applications, one of which is real-time processing. Real time processing typically involves reading data from a topic (source) doing some analytic or transformation work then writing the results to another topic (sink). Currently to do this type of work your choices are:
If you work on systems delivering large quatinties of data, you have probably heard of Kafka if you aren’t using it already. At a very high level, Kafka is a fault tolerant, distributed publish-subscribe messaging system that is designed for speed and the ability to handle hundreds of thousands of messages. Kafka has many applications, one of which is real-time processing. Real time processing typically involves reading data from a topic (source) doing some analytic or transformation work then writing the results to another topic (sink). Currently to do this type of work your choices are:
- Using your own custom code by using a KafkaConsumer to read in the data then writing out data via a KafkaProducer.
- Use a full fledged stream-processing framework such as Spark Steaming,Flink, Storm.
While either of those approaches are great, in some cases it would be nice to have a solution that was somewhere in the middle of those two. To that end, a Processor API was proposed via the KIP - Kafka Improvement Proposals process. The aim of the Processor API is to introduce a client to enable processing data consumed from Kafka and writing the results back into Kafka. There are two components of the processor client:
- A “lower-level” processor that providea API’s for data-processing, composable processing and local state storage.
- A “higher-level” stream DSL that would cover most processor implementation needs.
This marks a start of a series covering the new Kafka processor client, with this post covering the “lower-level” processor functionality. In subsequent posts we’ll cover the “higher-level” DSL and advanced use cases where we’ll bring in other technologies. For a full description of the motivation and goals of the processor client the reader is encouraged to read the original proposal.
Potential Use Cases For the Processor API
In my opinion here are a few reasons the Processor API will be a very useful tool:
- There is a need for notification/alerts on singular values as they are processed. In other words the business requirements are such that you don’t need to establish patterns or examine the value(s) in context with other data being processed. For example you want immediate notification that a fraudulent credit card has been used.
- You filter your data when running analytics. Filtering out a medium to large percentage of data ideally should be re-partitioned to avoid data-skew issues. Partitioning is an expensive operation, so by filtering out what data is delivered to your analytics cluster, you can save the filter-repartition step.
- You want to run analytics on only a portion of your source data, while delivering the entirety of you data to another store.
First Processor Example
The first example of the processor we’ll transform fictitious customer purchase data and perform the following actions:
- A processor to mask credit card numbers.
- A processor to collect the customer name and the amount spent to use in a rewards program.
- A procssor to collect the zip code and the item purchased to help determine shopping patterns.
Here’s the code for our 3 processors
public class CreditCardAnonymizer extends AbstractProcessor<String, Purchase> {

    private static final String CC_NUMBER_REPLACEMENT="xxxx-xxxx-xxxx-";

    @Override
    public void process(String key, Purchase purchase) {
          String last4Digits = purchase.getCreditCardNumber().split("-")[3];
          Purchase updated = Purchase.newBuilder(purchase).creditCardNumber(CC_NUMBER_REPLACEMENT+last4Digits).build();
          context().forward(key,updated);
          context().commit();
    }
}

public class CustomerRewards extends AbstractProcessor<String,Purchase> {

    @Override
    public void process(String key, Purchase value) {
        String customer = value.getLastName()+", "+value.getFirstName();
        double amount = value.getPrice() * value.getQuantity();
        RewardAccumulator accumulator = new RewardAccumulator(customer,amount);
        context().forward(key,accumulator);
        context().commit();

    }
}

public class PurchasePatterns extends AbstractProcessor<String, Purchase> {

    @Override
    public void process(String key, Purchase value) {
        PurchasePattern purchasePattern = PurchasePattern.newBuilder().date(value.getPurchaseDate())
                .item(value.getItemPurchased())
                .zipCode(value.getZipCode()).build();
        context().forward(key, purchasePattern);
        context().commit();
    }
}
Let’s breifly describe the structure of the processor objects. All three processors extend the AbstractProcessor class, which provides no-op overrides for the punctuate and close methods. In this example we just need to implement the process method, where the action is performed on each message. After work is completed, the context().forward method is called which forwards the modified/new key-value pair to downstream consumers. (The context() method retrieves the context instance variable initialized in the parent class by the init method). Then context().commit method is called, committing the current state of the stream including the message offset.
Building the Graph of Processors
Now we need to define the DAG to determine the flow of messages. This is where “the rubber meets the road” so to speak for the processor API. To build our graph of processing nodes we use the ToplogyBuilder. Although our messages are json, we need to define Serializer and Desrializer instances since the processors work with types. Here’s the portion of the code from the PurchaseProcessorDriver the builds the graph topology and serializers/deserializers.
//Serializers for types used in the processors
JsonDeserializer<Purchase> purchaseJsonDeserializer = new JsonDeserializer<>(Purchase.class);
JsonSerializer<Purchase> purchaseJsonSerializer = new JsonSerializer<>();
JsonSerializer<RewardAccumulator> rewardAccumulatorJsonSerializer = new JsonSerializer<>();
JsonSerializer<PurchasePattern> purchasePatternJsonSerializer = new JsonSerializer<>();

StringDeserializer stringDeserializer = new StringDeserializer();
StringSerializer stringSerializer = new StringSerializer();

 TopologyBuilder topologyBuilder = new TopologyBuilder();
 topologyBuilder.addSource("SOURCE", stringDeserializer, purchaseJsonDeserializer, "src-topic")

    .addProcessor("PROCESS", CreditCardAnonymizer::new, "SOURCE")
    .addProcessor("PROCESS2", PurchasePatterns::new, "PROCESS")
    .addProcessor("PROCESS3", CustomerRewards::new, "PROCESS")

    .addSink("SINK", "patterns", stringSerializer, purchasePatternJsonSerializer, "PROCESS2")
    .addSink("SINK2", "rewards",stringSerializer, rewardAccumulatorJsonSerializer, "PROCESS3")
    .addSink("SINK3", "purchases", stringSerializer, purchaseJsonSerializer, "PROCESS");

//Use the topologyBuilder and streamingConfig to start the kafka streams process
KafkaStreams streaming = new KafkaStreams(topologyBuilder, streamingConfig);
streaming.start();
There’s several steps here, so let’s do a quick walk through
- On line 11 we add a source node named “SOURCE” with a StringDeserializer for the keys and JsonSerializer genericized to work with Purchase objects and one to N number of topics that will feed this source node. In this case we are using input from one topic, “src-topic”.
- Next we start adding processor nodes. The
addProcessormethod takes a String for the name, a ProcessorSupplier and one to N number of parent nodes. Here the first processor is a child of the “SOURCE” node, but is a parent of the next two processors. A quick note here about the syntax for our ProcessorSupplier. The code is leveraging method handles which can used as lambda expressions for Supplier instances in Java 8. The code goes on to define two more processors in a similar manner. - Finally we add sinks (output topics) to complete our messaging pipeline. The
addSinkmethod takes a String name, the name of a topic, a serializer for the key, a serializer for the value and one to N number of parent nodes. In the 3addSinkmethods we can see the JsonDeserializer objects that were created earlier in the code.
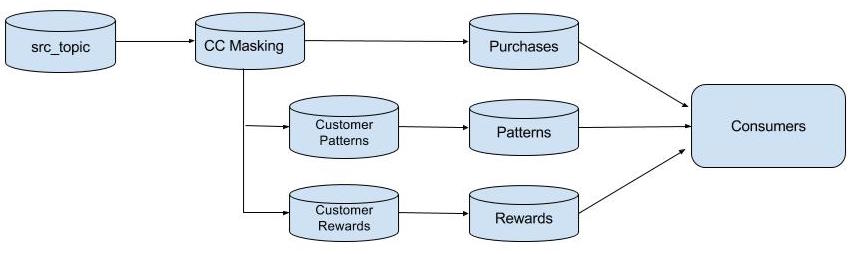
Here’s a diagram of the final result of the TopologyBuilder:
Stateful Processors
The processor API is not limited to working with current values as they arrive, but is also capable of maintaining state to use in aggregation, summation or joining messages that arrive later. To take advantage of stateful processing, create a KeyValueStore by using the TopologyBuilder.addStateStore method when creating the processing topology. There are two types of stores that can be created: 1)in memory and 2) a RocksDB store which takes advantage of using off-heap memory. The choice of which one to use could depend on how long lived the values will be. For a larger number of fairly static values the RocksDB would be a good choice, but for short lived entries the in-memory might be a better fit. The Stores class provides the serializer/deserializer instances when specifying String, Integer or Long keys and values. But if you are using a custom type for the keys and/or values, you’ll need to provide a custom Serializer and Deserializer.
Stateful Processor Example
To demonstrate the basic use of state in the processor API, we’ll use a another example, stock trading. In this example the processor will capture results for each trade and store aggregate information by ticker symbol. The aggregate information is then published periodically.
public class StockSummary extends AbstractProcessor<String, StockTransaction> {

    private KeyValueStore<String, StockTransactionSummary> summaryStore;


    public void process(String key, StockTransaction stockTransaction) {
        String currentSymbol = stockTransaction.getSymbol();
        StockTransactionSummary transactionSummary = summaryStore.get(currentSymbol);
        if (transactionSummary == null) {
            transactionSummary = StockTransactionSummary.fromTransaction(stockTransaction);
        } else {
            transactionSummary.update(stockTransaction);
        }
        summaryStore.put(currentSymbol, transactionSummary);

        this.context.commit();
    }


    @Override
    @SuppressWarnings("unchecked")
    public void init(ProcessorContext context) {
        this.context = context;
        this.context.schedule(10000);
        summaryStore = (KeyValueStore<String, StockTransactionSummary>) this.context.getStateStore("stock-transactions");
        Objects.requireNonNull(summaryStore, "State store can't be null");

    }


    @Override
    public void punctuate(long streamTime) {
        KeyValueIterator<String, StockTransactionSummary> it = summaryStore.all();
        long currentTime = System.currentTimeMillis();
        while (it.hasNext()) {
            StockTransactionSummary summary = it.next().value;
            if (summary.updatedWithinLastMillis(currentTime, 11000)) {
                this.context.forward(summary.tickerSymbol, summary);
            }
        }
    }

}
In this example we see the process method along with two overridden methods: init and punctuate. The process method extracts the stock symbol, updates/creates the trade information then places the summary results in the store.
In the init method we are:
- Setting the ProcessorContext reference.
- Calling the
ProcessorContext.schedulemethod which controls how frquently thepunctuatemethod is executed. In this case it’s every 10 seconds. - Getting a reference to the state store created when constructing the
TopologyBuilder(we’ll see that part next).
The punctuate method iterates over all the values in the store and if they have been updated with the last 11 seconds, the StockTransactionSummary object is sent to consumers.
Constructing a TopologyBuilder with a State Store
As in the previous example, looking at the processor code is only half the story. Here’s the section from the source code that creates our TopologyBuilder including a KeyValueStore:
 TopologyBuilder builder = new TopologyBuilder();

 JsonSerializer<StockTransactionSummary> stockTxnSummarySerializer = new JsonSerializer<>();
 JsonDeserializer<StockTransactionSummary> stockTxnSummaryDeserializer = new JsonDeserializer<>(StockTransactionSummary.class);
 JsonDeserializer<StockTransaction> stockTxnDeserializer = new JsonDeserializer<>(StockTransaction.class);
 JsonSerializer<StockTransaction> stockTxnJsonSerializer = new JsonSerializer<>();
 StringSerializer stringSerializer = new StringSerializer();
 StringDeserializer stringDeserializer = new StringDeserializer();


 builder.addSource("stocks-source", stringDeserializer, stockTxnDeserializer, "stocks")
        .addProcessor("summary", StockSummary::new, "stocks-source")
        .addStateStore(Stores.create("stock-transactions").withStringKeys()
                .withValues(stockTxnSummarySerializer,stockTxnSummaryDeserializer).inMemory().maxEntries(100).build(),"summary")
        .addSink("sink", "stocks-out", stringSerializer,stockTxnJsonSerializer,"stocks-source")
        .addSink("sink-2", "transaction-summary", stringSerializer, stockTxnSummarySerializer, "summary");

 System.out.println("Starting KafkaStreaming");
 KafkaStreams streaming = new KafkaStreams(builder, streamingConfig);
 streaming.start();
 System.out.println("Now started");
For the most part, this is very similiar code in terms of creating serializers, deserializers and the topology builder. But there is one difference. On lines 13 and 14 we are creating an in-memory state store (named “summary”) to be used by the processor. The name passed to the Stores.create method is the same we used in the processor init method to retieve the store. When specifying the keys we can use the convenience method Stores.withStringKeys() that requires no argments since Strings are a supported type. But since we are using a typed value, the withValues method is used and provides serializer and deserializer instances.
Running the Processors with Example Code
The examples shown here can be run against a live Kafka cluster. Instructions are provided in the github repository for the blog.
Conclusion
So far we have covered the “lower level” portion of the Processor API for Kafka. Hopefully one can see the usefulness and versatility this new API will bring to current and future users of Kafka. In the next post we will cover the “higher level” DSL api and cover addtion topics such as joining and time window functions. One final thing to keep in mind is that the Processor API/Kafka streams is a work in progress and will continue to change for a while.
Resources
- kafka-streams source code for this post.
- Main Kafka Site
- KIP-28
Subscribe via RSS